ErgoThink T420 Laptop Tray
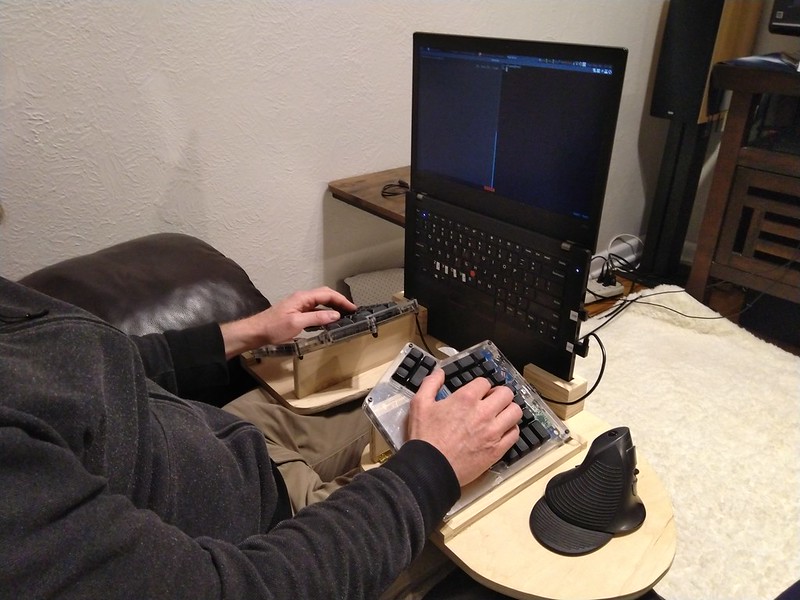
Last weekend I built a custom laptop tray design to fit my ThinkPad T480 laptop, my ergodox split keyboard, and my vertical mouse comfortably on my lap. We did 3 rounds of build/prototypes and I'm really happy with the one we have.
Motivation and Context
I have two main setups where I do my computing. I have a sit/stand desk in my office well-appointed with tented split keyboard, vertical mouse, laptop stand putting the screen at proper height (which I also custom designed and built), etc. I also like to just use the laptop directly for brief sessions of reading and browsing where I don't have to do extensive typing.
I wanted a way to work from the couch while also still having the great typing experience afforded by my ergodox keyboard. My ThinkPad T480 screen opens to a full 180 degrees which also puts the screen at a much more ergonomic position. I had a thought that if I could put the laptop fully open that might allow me to set up the ergodox where the laptop keyboard would normally be, turning the laptop keyboard into effectively just a monitor stand.
Conception
As these things generally go, I started to get ideas on a design while lying in bed trying unsuccessfully to fall asleep, so I got up and did some sketches in my notebook. The basic idea was to build a pair of C-shaped slots to hold the corners of the laptop down and then some curbs to keep the ergodox in a fixed position.
Prototyping
I was pretty excited to try it out and casting about in the shop we found some corner clamps we recently 3D printed just for fun that actually kind of worked to hold the laptop up. So that gave us a shortcut to a v1 prototype which we made out of 3/4" plywood for the base and some stacks of 1/2" plywood for the keyboard curbs.
I was able to test that on Friday night and it worked, but the big piece of 3/4" plywood was really heavy and the slack in the corner clamps allowed the laptop to flap front to back quite a bit which made it a bit terrifying to carry around.
But it was good enough to know the basic approach would be fine.
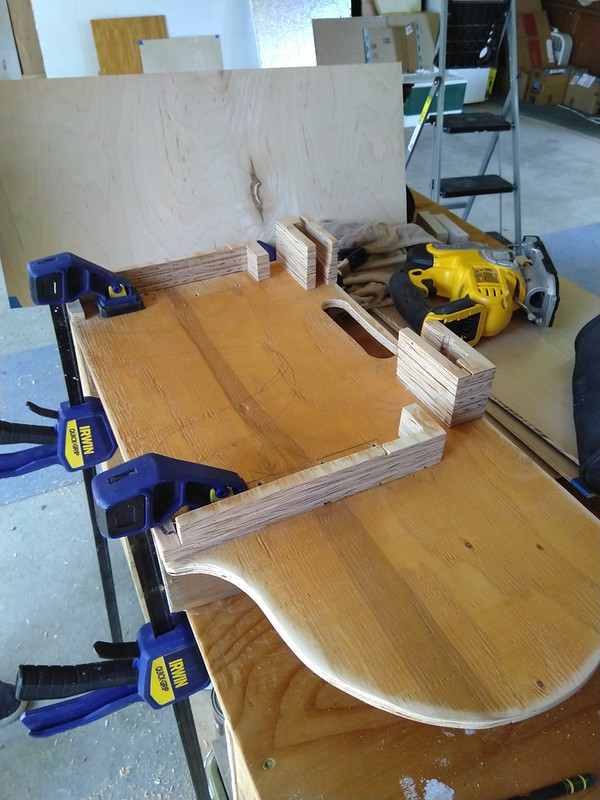
So Saturday we did another version this time out of 1/2" plywood for everything. I designed some laptop clamps which had a pretty cool construction method:
- rough cut some oversized rectangles big enough to make both sides of the clamp
- stack that 4 layers high and glue it up into a big block
- Then cut it down to final dimensions and square up the corners on the table saw sled
- Cutting the long edge just barely fit in our sled's capacity
- The use a forstner bit to drill holes to fit where the laptop bottom pads go. Locate this so in the end it will be a semicircular cylinder slot instead of a full hole.
- Cut that in half
- On the table saw sled with the blade quite high, hog out the interior of the "C" shape and do test fits until sneaking up on a nice fit for the laptop.
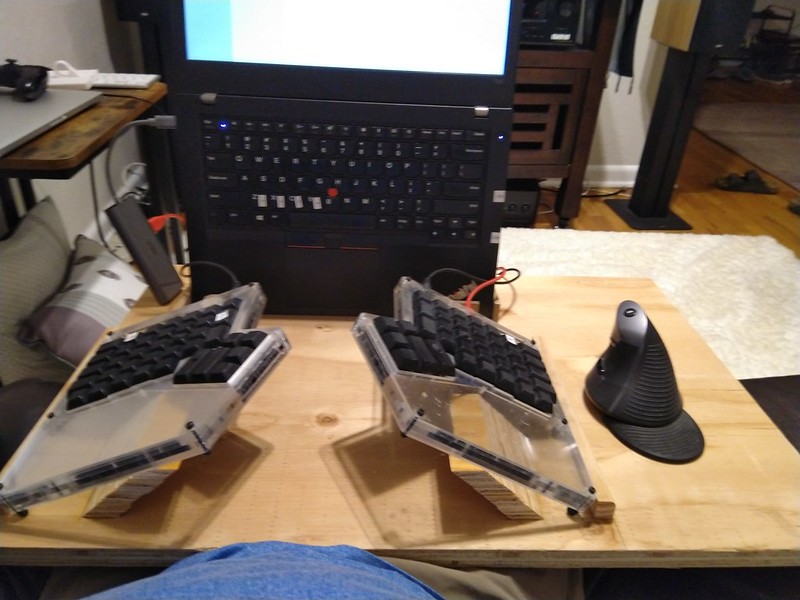
We didn't get the construction fully dialed until v3 but once we did it's a good balance of easy to put the laptop in and take it out, but it's stable in use and also if you are walking around carrying the tray with you.
v3 prototype
v2 was much better but I wanted another crack at the laptop slots and a much smoother mouse area, so the next day we made v3 out of nice baltic birch plywood and sanded most surfaces at 80, 120, and 240 grit to get really smooth surfaces.
I bought the smallest hinges they sell at Lowe's and made some collapsible keyboard tenting supports. These ended up feeling really stable and solid.
Finishing touches
The gap between the ergodox and the laptop is small. Not even 2", so with the TRRS and USB cables coming out of the ergodox in that direction, they were feeling and looking cramped. I found a 9" TRRS cable with 90 degree connectors that fit the space perfectly and also a 6" mini USB to USB A 90-degree cable so now everything has just a tiny bit of slack so they can be comfortably connected and disconnected but are so well-sized that they don't dangle down onto the tray at all and have no need for coiling or cable management of any kind.
Putting it to Use
I'm planning a writing retreat later this month so this setup should get a lot of use. I'm looking forward to it!
Dual-Purpose
The icing on this cake was sort of a surprise. I can leave the whole tray/rig set up, place it on my desk, and it works fine there too. So this will replace the custom stand I built earlier and all I do to "undock" from the desk is disconnect the power cable and carry the tray away.